Thursday, 28 August 2014

On the Bench: Citroen 2CV

A Revell Citroen 2CV begins to take shape on the workbench – or in this case, on the worktop.

I am in the process of moving house, and many of my possessions are now packed up and in storage. This means all my model kits and modelling tools are packed away, and even my desk has been dismantled and taken away. As my house move drags on, I have started to get restless and this weekend I finally snapped – I bought a 1/24 scale Revell Citroen 2CV kit, some paints, brushes and tools and effectively started modelling from scratch. With no desk, building is taking place on my kitchen worktop.
This actually opened my eyes: if you want to begin modelling these days, there are some really handy tool sets available. At my local model shop (Regal models, Chatham) I picked up a Humbrol-branded set comprising a sharp craft knife, tweezers, sprue cutters and a file for £9.99. I also purchased some polystyrene cement glue, two brushes (small and medium sized), silver and light grey enamel paints, and mid-grey and satin black acrylic aerosol paints. From Halfords, I picked up an aerosol of Ford Fjord Blue paint and what I thought in my distracted mood was some white plastic primer (it was actually a can of surface cleaner, not what I wanted but it still turned out to be useful). 


This shot shows slight weathering on the canvas roof, and the decent paint shine achieved straight from the aerosol can. 

The build began with one of my favourite jobs: giving the body shell its colour coat. Without any primer I was concerned that the paint finish might not be very good, but I was actually quite pleased with how it turned out. The paint is non-metallic so has a decent shine straight from the can. I want this basic 2CV to look a bit careworn and used, so I will not bother to polish the paint – after all, the real car would probably never have been polished in its life!

 
My new tools alongside the painted body shell.

At this time I also gave the chassis parts, floor and dashboard parts a coat of satin black, and the seats and interior panels got a coat of mid-grey. I then brush painted the wheels, grille and bumpers with light-grey enamel. The kit includes a chrome grill and headlamps and chrome hubcaps, but my 2CV will be a basic workhorse so I deliberately painted over the chrome on the grill and headlamps to represent the plastic items from an older, base-model 2CV. I will not fit the chrome hubcaps either. When I finished painting, I realised that my brush cleaning fluid - white spirit - is also all packed away, but luckily the surface cleaner I accidentally purchased works a treat as brush cleaner, so that worked out nicely!

 
 More or less everything is now painted.

With most of the parts now painted, I used the light-grey enamel to dry-brush the floor, seats and roof. This is to give the impression of a little wear and to add some additional texture to the parts, to make them look more like fabric. The roof is fine I think, and the floor is OK, but I’m not really happy with the effect on the seats so I might do some work there (I might buy a set of weathering powders to improve the seats, which I also want to use on the exterior of the finished model).
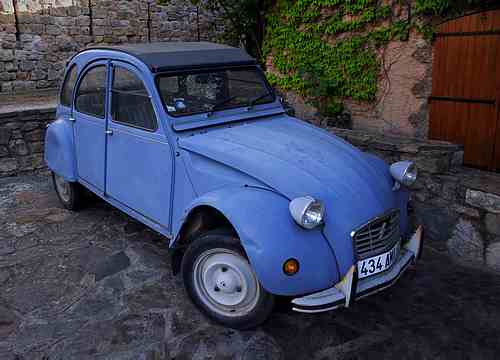
 
This is the look I am going for with my 2CV.


Tuesday, 26 August 2014

Making Model Snow – and a Sea King helicopter


It’s been a while since I updated this blog, so I thought I’d mark my return by fulfilling a promise I made earlier on: explaining how I made the model snow on the WW2 weekend diorama project. I used the same technique to create snow on a model helicopter display base, which is what the photos in this post show. I built the Royal Navy Sea King helicopter as a Christmas present for my brother last December, and in looking for an interesting way to display it, decided to use the snow technique again.
Click on any of these images to view a larger version.


The snow is very easy to make. I can’t take credit for the technique myself, as I simply did a Google search on how to make model snow and came across this method on several different modelling forums. You will need:

PVA glue (woodwork glue)

Baking soda

Water

All you need to do is mix the three together. I found that mixing the PVA with just a little water enabled me to judge the quantity I was making, then adding the baking soda afterwards turned the gloopy diluted PVA into a thicker and brighter white mixture. The thickness of mixture that you create will determine what kind of snow effect you end up with: for this display base, and for the WW2 diorama I made earlier on, I used a fairly thick mixture which when dry gave the effect of areas of half-melted snow. Once you have your mixture (I mixed it up in a small cat food tin), it can be applied with anything that comes to hand – I used a small strip of card. On the helicopter display base, I used some thinned black paint and Tamiya weathering powers to suggest areas of ‘dirty’ snow, where people’s feet, vehicle wheels and a few oil or diesel spills have discoloured the snow and made it look dirty.
 
The based itself is simply a round chopping board, available fairly cheaply from many shops, covered with a piece of fine wet & dry sandpaper cut to size to represent tarmac. I applied the snow onto this, weathered it as described above, then secured the helicopter to the base. It is not based on any real location, but is supposed to represent a dispersal somewhere around Stanley in the Falkland Islands.


The helicopter kit used here is the old Airfix Sea King AEW Mk2 kit, which is supposed to represent a submarine hunter complete with a large radome built onto the starboard side. I didn’t want to make mine a sub-hunter, as the one my brother had flown in was a regular RAF chopper, so I didn’t add the radome or other anti-sub gubbins. The kit itself is really showing its age and posed a number of problems during construction: the fuselage halves fitted together rather poorly, requiring a lot of filler to smooth out the gaps, and the cockpit glazing and nose area didn’t fit together well either, so more filler was needed there. Also, kit manufacturing was not very advanced back when this kit was designed, so the complex nose windows have over-thick frames and are therefore the wrong shape. Following other people’s lead, I helped to disguise the incorrect nose windows by adding painted-on black surrounds to the windows, giving the illusion of larger windows with fine frames.
 
The overhead cockpit windows were tinted green with translucent paint, representing the tinted windows on the real craft, and with the windows masked off using masking fluid, the whole model was given a coat of grey paint to match Navy Sea Kings of the early 1990s. I must say that the masking fluid did not work well, requiring quite a lot of touching in after I finally managed to remove it from the glazing. I will need to find a better solution for future projects. After final painting and a coat of Johnson Klear floor wax to seal the decals and add a slight sheen, I used Tamiya weathering powders to add some subtle staining and grime to the Sea King. Also, many photos of real Sea Kings I managed to find showed that when parked, they tend to have large removable red plugs in the engine air intakes and exhaust, so I made some from scrap plastic, painted them red and attached them to the model.  

Sunday, 24 November 2013

How to Build a Military Diorama: weekend project PART 3 - FINISHED!

The weekend diorama project is finally done! Read on to see the tank and the soldiers finished and painted and the diorama created.

Last night when I posted Part 2, the tank was nearly built and the diorama base was almost complete. Today's first job was to finish the base, for which I decided to add some snow to create a wintry scene. Also, as I had spent minimal time on the grass and hedge, the snow would help cover up my rather basic approach to the foliage. The snow was easily created with a mixture of PVA glue, bicarbonate of soda and water. Only a tiny amount was needed, enough to fill a dessert spoon: the mixture was stirred to the consistency of yoghurt and dripped onto the base with a waste plastic strip.


With the 'snow' drying, it was time to get back to the tank and the soldiers. I put the wheels on the tank and painted it olive green, then gave the soldiers a coat each of a slightly lighter green, avoiding their faces and hands (I had already painted their faces and hands with flesh-colour last night). I then went out for a walk for about an hour and a half, and on my return I put the tracks on the tank, followed by the mudguards which partially cover them. The kit includes a 50-calibre machine gun to go on the turret roof, but I thought it looked to big and a bit over-scale, so I left it off. I also painted the soldiers' boots, weapons and various pouches and packs. With the tank complete, I put on the few markings (waterslide decals/transfers) and after a cup of tea to let them dry out, I applied some weathering. I started off using a thin oil paint wash, but it attacked the still-unhardened olive green paint so I left that and did the weathering with Tamiya weathering powders. A few dark and light streaks and smudges add a used look to the tank. I had also saved the remaining paint left over from painting the road yesterday, so I dry-brushed some onto the tank tracks and lower surfaces to represent road dirt and mud, and to help 'blend' the tank into the scene.


With the tank and soldiers ready for battle, it was time to fix them to the diorama base. In keeping with the quick and care-free approach to this project, I didn't do any research at all into realistic WW2 US patrol formations or tactics: instead, I just placed the tank and figures how I thought would look interesting. With that done, the project was finished, just 48 hours after I began!
 
My idea for this scene is that a US infantry unit is advancing into Germany in the first few weeks of 1945, with snow still thawing as they go. This unit, supported by an M-24 Chaffee light tank, has spotted an enemy post dug in half a mile ahead. While the rest of the unit, including the CO with his pistol, provide flanking cover on both sides of the road, a section of three men runs forward to take a look and identify the extent of the threat ahead. When they return with the information, the tank will attempt to destroy the enemy position with its main gun, and the patrol will move forward.
 
Enough words - here are the pictures. Don't forget, you can click on the images to see them enlarged. Thanks very much for coming to take a look.


Saturday, 23 November 2013

How to Build a Military Diorama: weekend project PART 2


Read Part 1 here

The weekend diorama project has moved on significantly in the last 24 hours, though we’re not finished yet!

Yesterday, I got as far as making a basic base for the diorama from a polystyrene pizza base and a skim of household wall filler. Today’s first job was to give the base a coat of paint to form a basis for the scenery: because I want the diorama to be a muddy European scene from WW2, I used a mixture of dark brown, beige and black acrylic artists paint to create a grey-brown muddy colour. I watered it down a little and gave the base a couple of light coats.


The ambient temperature is pretty low here at the moment, so the paint was taking ages to dry. I heated my oven to 50C and popped the base in for 10 minutes to speed the drying. After that, I got out some scenic materials to add grass to the banks and roadsides. I used a couple of different shades of green scatter material made specially for models and model railways, and added a low hedge with some synthetic material again intended for model railways. All this was applied over a thin diluted coat of PVA glue, then a very diluted mix of PVA was dripped over the ‘grass’ using an old contact lens solution bottle.

 
While the base dried out between painting and adding the grass, it was time to make a start on the tank and the figures. All parts were given a coat of Humbrol primer from an aerosol can, to provide a decent base for paint when the time comes. In this photo, you can see the two pieces that make up the small base that is included with the tank model: I decided not to use it, as I am (obviously) making my own base.


The primer dried out while I worked on the diorama base (see above), so in the afternoon I was able to begin building the M24 Chaffee tank. This was a fairly quick job in modelling terms, taking a couple of hours from start to the 80% complete build you see below. This is a Revell kit which was actually designed and originally sold by Matchbox back in the early 1980s, and it really is a great little kit. The parts are moulded crisply and fit together very well, and the detail is really not bad at all for the tiny size. You can see how little the tank is compared with the standard Humbrol paint tin in the photo. You can see that I have pre-painted the lower hull sides, and the backs of the wheels, so they will not require painting when the tank is fully assembled - otherwise they would be practically impossible to paint.

Sweet!

I think it’s going to build up to be a very nice model, I just hope the diorama base matches up to the same standard!

Come back tomorrow to see the project completed.

Friday, 22 November 2013

How to Build a Military Diorama: weekend project

I love building dioramas: this weekend I am going to build a simple military diorama from scratch and keep a photo diary. Hopefully you will pick up a few ideas along the way, and on Sunday night we should have a finished model to display!

Like most modellers I have many unbuilt kits in storage awaiting their time on the workbench. I have some quite complex and ambitious plans for some of them, meaning I won't start building without a lot of preparation and planning. However, sometimes it's nice to leave those valued kits where they are and crack on with something quickly without worrying too much about how it turns out.


Today I bought two small military kits in 1/76 scale: Revell's WW2 US infantry and M24 Chaffee tank, for £5.99 each. I also bought a tube of Polyfilla to help make a scenic base. I am going to build a small WW2 diorama over the weekend.

The first job was to create the diorama base. In line with the low-budget approach to this project, I am using a polystyrene base from a fresh pizza, onto which I will add scenic details. I wanted my model to fit onto a small round plinth, so the first job was to cut the polystyrene base to size. I simply drew around a plate with a Sharpie marker to get the size, and cut it out with scissors.

 Next job was to create some basic 'forms' as a basis for terrain features: I used offcuts of the polystyrene pizza base to create shallow banks with a flat road bed between them, to recreate a typical European back road. These were fixed in place with polystyrene cement (normal model glue).
I had time for a cup of tea while the glue dried, after which I opened the Polyfilla and applied a thin coating of filler, to blend in the road bed and banks and create a decent base for the scenery.

It is not really clear in the photo, but the banks either side of the road will work out between 2 feet and 6 feet tall in 1/76 scale, just right for earth banks either side of a European country road. Top tip: keep a bowl of warm water on hand when you're applying filler to make groundwork. You can use it to wet your fingers to smooth the surface of the filler, and to keep your hands clean!

Tune in tomorrow to see the next update!

Saturday, 21 September 2013

A Quiet Evening in Lincolnshire: Lancaster Diorama Finished!


My WW2 Lancaster diorama, A Quiet Evening in Lincolnshire, is finally finished. You can read all about the making of it in previous blog posts, so I won't say too much: instead I’ll let the photos do the talking.


AEC Matador refuelling bowser tops up the Lanc's starboard tank


Three 'erks' work on the port-inner Merlin engine while an officer looks on
 
 A sergeant arrives in a Bedford MW, accompanied by a WAAF
 
Important documents arriving by bicycle
 
A father and his two sons watch progress from behind the hedge

Z-Zulu, the star of the scene, a Lancaster B.III


To make this diorama I used:

Revell 1/72 Lancaster B.I/III

Airfix 1/72 Bomber Resupply Set

Airfix WW2 RAF Personnel

Revell WW2 RAF Ground Crew

Oxford Diecast 1/76 RAF David Brown tractor

Wills 1/76 weigh bridge hut

Model Scene 1/76 schoolboys and master

Woodland Scenics foliage and scenery

Sunday, 8 September 2013

A Quiet Evening in Lincolnshire: Lancaster Diorama Part 5


Time for a quick update on the WW2 RAF bomber base diorama. The Lancaster is now practically finished, with a just a handful of aerials and navigation lights to fit, so I thought I would take advantage of a break in the rain to take it outside and get some photos. You can see some white blobs in the cockpit, which are caused by the PVA glue I used to attach the glazing. It will be clear and invisible when it’s dry.


The ‘Lanc’ was painted with Humbrol paints. First I airbrushed the whole plane with no.30 enamel for the green, then hand-painted no.29 brown enamel to make the camouflage pattern. The upper surfaces were then masked off and the extensive black underside was sprayed with Humbrol gloss black acrylic paint from an aerosol can. 

The whole model was then sprayed with Humbrol gloss acrylic aerosol paint to provide a good smooth base for the decals (transfers). When the decals had been applied and allowed to dry, the aircraft was sprayed with Humbrol matt acrylic. The main reason for this part of the process is to prevent silvering of the decals, which often happens if they applied onto a matt surface – air remains trapped beneath the decals and the rough matt surface, and gives a silvered or frosted look to the markings. Trapping the decals between a gloss undercoat and a matt overcoat not only minimises silvering, but also helps to blend the decals in so they appear to be painted on. Actually it didn’t work 100% on this model, though I was able to resolve the silvering using a technique I found online, and which I will go into another time. Some subtle weathering was applied using dilute black oil paint, especially on the wing surfaces behind the exhausts so represent exhaust staining. Detail parts such as the turrets, cockpit glazing, under carriage and propellers were fitted after painting was completed.


Now the Lancaster is ready to be placed in the diorama, and the vehicles and figures placed around it to create the scene. Most of the work is now done, and the diorama should be finished very soon.