Thursday 28 August 2014

On the Bench: Citroen 2CV

A Revell Citroen 2CV begins to take shape on the workbench – or in this case, on the worktop.

I am in the process of moving house, and many of my possessions are now packed up and in storage. This means all my model kits and modelling tools are packed away, and even my desk has been dismantled and taken away. As my house move drags on, I have started to get restless and this weekend I finally snapped – I bought a 1/24 scale Revell Citroen 2CV kit, some paints, brushes and tools and effectively started modelling from scratch. With no desk, building is taking place on my kitchen worktop.
This actually opened my eyes: if you want to begin modelling these days, there are some really handy tool sets available. At my local model shop (Regal models, Chatham) I picked up a Humbrol-branded set comprising a sharp craft knife, tweezers, sprue cutters and a file for £9.99. I also purchased some polystyrene cement glue, two brushes (small and medium sized), silver and light grey enamel paints, and mid-grey and satin black acrylic aerosol paints. From Halfords, I picked up an aerosol of Ford Fjord Blue paint and what I thought in my distracted mood was some white plastic primer (it was actually a can of surface cleaner, not what I wanted but it still turned out to be useful). 


This shot shows slight weathering on the canvas roof, and the decent paint shine achieved straight from the aerosol can. 

The build began with one of my favourite jobs: giving the body shell its colour coat. Without any primer I was concerned that the paint finish might not be very good, but I was actually quite pleased with how it turned out. The paint is non-metallic so has a decent shine straight from the can. I want this basic 2CV to look a bit careworn and used, so I will not bother to polish the paint – after all, the real car would probably never have been polished in its life!

 
My new tools alongside the painted body shell.

At this time I also gave the chassis parts, floor and dashboard parts a coat of satin black, and the seats and interior panels got a coat of mid-grey. I then brush painted the wheels, grille and bumpers with light-grey enamel. The kit includes a chrome grill and headlamps and chrome hubcaps, but my 2CV will be a basic workhorse so I deliberately painted over the chrome on the grill and headlamps to represent the plastic items from an older, base-model 2CV. I will not fit the chrome hubcaps either. When I finished painting, I realised that my brush cleaning fluid - white spirit - is also all packed away, but luckily the surface cleaner I accidentally purchased works a treat as brush cleaner, so that worked out nicely!

 
 More or less everything is now painted.

With most of the parts now painted, I used the light-grey enamel to dry-brush the floor, seats and roof. This is to give the impression of a little wear and to add some additional texture to the parts, to make them look more like fabric. The roof is fine I think, and the floor is OK, but I’m not really happy with the effect on the seats so I might do some work there (I might buy a set of weathering powders to improve the seats, which I also want to use on the exterior of the finished model).

 
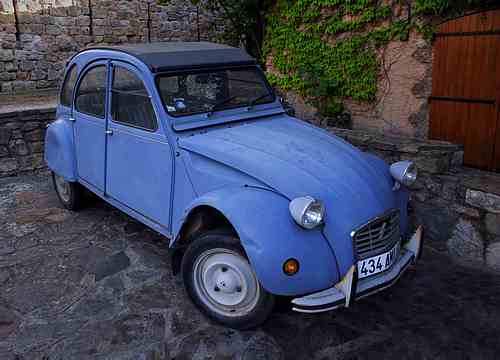
This is the look I am going for with my 2CV.


Tuesday 26 August 2014

Making Model Snow – and a Sea King helicopter


It’s been a while since I updated this blog, so I thought I’d mark my return by fulfilling a promise I made earlier on: explaining how I made the model snow on the WW2 weekend diorama project. I used the same technique to create snow on a model helicopter display base, which is what the photos in this post show. I built the Royal Navy Sea King helicopter as a Christmas present for my brother last December, and in looking for an interesting way to display it, decided to use the snow technique again.
Click on any of these images to view a larger version.


The snow is very easy to make. I can’t take credit for the technique myself, as I simply did a Google search on how to make model snow and came across this method on several different modelling forums. You will need:

PVA glue (woodwork glue)

Baking soda

Water

All you need to do is mix the three together. I found that mixing the PVA with just a little water enabled me to judge the quantity I was making, then adding the baking soda afterwards turned the gloopy diluted PVA into a thicker and brighter white mixture. The thickness of mixture that you create will determine what kind of snow effect you end up with: for this display base, and for the WW2 diorama I made earlier on, I used a fairly thick mixture which when dry gave the effect of areas of half-melted snow. Once you have your mixture (I mixed it up in a small cat food tin), it can be applied with anything that comes to hand – I used a small strip of card. On the helicopter display base, I used some thinned black paint and Tamiya weathering powers to suggest areas of ‘dirty’ snow, where people’s feet, vehicle wheels and a few oil or diesel spills have discoloured the snow and made it look dirty.
 
The based itself is simply a round chopping board, available fairly cheaply from many shops, covered with a piece of fine wet & dry sandpaper cut to size to represent tarmac. I applied the snow onto this, weathered it as described above, then secured the helicopter to the base. It is not based on any real location, but is supposed to represent a dispersal somewhere around Stanley in the Falkland Islands.


The helicopter kit used here is the old Airfix Sea King AEW Mk2 kit, which is supposed to represent a submarine hunter complete with a large radome built onto the starboard side. I didn’t want to make mine a sub-hunter, as the one my brother had flown in was a regular RAF chopper, so I didn’t add the radome or other anti-sub gubbins. The kit itself is really showing its age and posed a number of problems during construction: the fuselage halves fitted together rather poorly, requiring a lot of filler to smooth out the gaps, and the cockpit glazing and nose area didn’t fit together well either, so more filler was needed there. Also, kit manufacturing was not very advanced back when this kit was designed, so the complex nose windows have over-thick frames and are therefore the wrong shape. Following other people’s lead, I helped to disguise the incorrect nose windows by adding painted-on black surrounds to the windows, giving the illusion of larger windows with fine frames.
 
The overhead cockpit windows were tinted green with translucent paint, representing the tinted windows on the real craft, and with the windows masked off using masking fluid, the whole model was given a coat of grey paint to match Navy Sea Kings of the early 1990s. I must say that the masking fluid did not work well, requiring quite a lot of touching in after I finally managed to remove it from the glazing. I will need to find a better solution for future projects. After final painting and a coat of Johnson Klear floor wax to seal the decals and add a slight sheen, I used Tamiya weathering powders to add some subtle staining and grime to the Sea King. Also, many photos of real Sea Kings I managed to find showed that when parked, they tend to have large removable red plugs in the engine air intakes and exhaust, so I made some from scrap plastic, painted them red and attached them to the model.